
This chapter covers the following topics:
Commands for working with profiles
Some commands for working with profiles operate at a directory level, displaying information about any profile in the system. Other commands operate only on the working profile-the profile that has been read into the system's edit buffer.
Table 3-2 lists MAX TNT commands that operate only on the working profile:
For information about each command, see the MAX TNT Reference Guide.
Profile types and indexes
A profile is a group of configuration parameters related to a particular purpose. Different types of profiles are supported. For example, Connection profiles contain parameters related to a WAN connection, and T1 profiles contain parameters related to configuring a T1 line.
admin> dirThe left column shows a list of profile types in the system, and the right column describes the purpose of each profile type. In many cases, there are more than one profile of a given type. Each profile of the same type must have a unique index, which may be a name or an address within the system.
ADMIN-STATE SNMP Administrative State
ANSWER-DEFAULTS Answer profile
BASE System version and enabled features
CALL-INFO Active call information
CALL-ROUTE Call routing attributes
CONNECTION Connection (WAN) profiles
DEBUG Debug Profile
DEVICE-STATE Device Operational State
ERROR Fatal Error log
ETHERNET Ethernet interfaces
EXTERNAL-AUTH External authentication info
FILTER Filter Profile
FIREWALL Firewall Profile
FRAME-RELAY Frame-Relay link configuration
IP-GLOBAL Global TCP/IP parameters
IP-INTERFACE IP interfaces
IP-ROUTE Static IP routes
LAN-MODEM LAN Modem Disable State
LOG System event logging configuration
RADIUS-STATS RADIUS statistics
SERIAL Serial interfaces
[More? <ret>=next entry, <sp>=next page, <^C>=abort]
To list all profiles of a given type, specify the profile type on the command line. For example, to list the two User profiles that ship with the system:
admin> dir userIn this command output, the leftmost column shows how many bytes of flash memory are used to store the profile. The second and third columns show the date and time the profile was last modified. The rightmost column shows the profile's index (in this case, a name).
9 07/07/1997 12:49:24 default
33 07/08/1997 14:20:28 admin
Connection profiles
Filter profiles
Firewall profiles
Frame-Relay profiles
IP-Route profiles
User profiles
To display or create one of the profiles, you must specify its index on the command line. For example:
admin> get user defaultWhen you list a User profile's contents, you'll see an asterisk next to the Name parameter, indicating that this is the profile's index.
name* = default
password = ""
active-enabled = yes
allow-termserv = no
allow-system = no
allow-diagnostic = no
allow-update = no
allow-password = no
allow-code = no
idle-logout = 0
prompt = *
default-status = no
top-status = general-info
bottom-status = log-window
left-status = connection-list
use-scroll-regions = no
log-display-level = none
Answer-Defaults profile
Base profile
External-Auth profile
IP-Global profile
Log profile
SNMP profile
System profile
Terminal-Server profile
To display the contents one of these profiles, you simply specify the profile type on the command line. For example:
admin> get system
name = test-224
system-rmt-mgmt = yes
use-trunk-groups = no
idle-logout = 0
parallel-dialing = 2
single-file-incoming = yes
analog-encoding = u-law
sessionid-base = 0
t-online = no
call-routing-sort-method = item-first
t-online-offset = 0
shelf-controller-type = standalone
master-shelf-controller = 1
Ethernet profiles
E1 profiles
Serial profile
SWAN profiles
T1 profiles
T3 profiles
and so forth, depending on the types of cards installed in the system. For example, if you install an eight-port T1 card in shelf 1, slot 13 of the MAX TNT, the system creates the following profiles:
admin> dir t1When you list a T1 profile's contents, you'll see an asterisk next to the physical address parameter, indicating that this is the profile's index:
155 07/11/1997 15:50:31 { shelf-1 slot-13 2 } ""
152 07/07/1997 12:49:36 { shelf-1 slot-13 3 } ""
152 07/07/1997 12:49:36 { shelf-1 slot-13 4 } ""
152 07/07/1997 12:49:36 { shelf-1 slot-13 5 } ""
152 07/07/1997 12:49:36 { shelf-1 slot-13 6 } ""
152 07/07/1997 12:49:36 { shelf-1 slot-13 7 } ""
152 07/07/1997 12:49:36 { shelf-1 slot-13 8 } ""
320 07/08/1997 19:48:58 { shelf-1 slot-13 1 } ""
admin> listEach device in the MAX TNT has a physical address composed of its shelf number, slot number, and item number in the following format:
physical-address* = { shelf-1 slot-1 3 }
line-interface = { no d4 ami eligible middle-priority inband wink-start +
{ shelf-N slot-N item-N }
For a standalone system, the shelf number is always 1. In multishelf systems, the shelf number is from 1 to 9.
Figure 3-1 shows how the slots are numbered on the back panel of a standalone shelf.
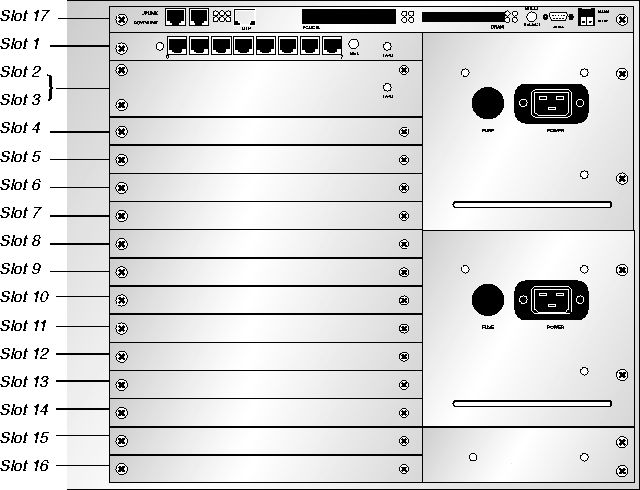
Figure 3-1. Back panel of a MAX TNT shelf
controller or c. For example, the following addresses are equivalent and all refer to the shelf-controller:
{ 1 controller 0 }
{ 1 c 0 }
{ 1 17 0 }
Expansion slots are numbered from 1 to 16, starting with the top expansion slot just below the shelf-controller. For example, the first slot on shelf 1 has the following address:
{ 1 1 0 }
A modem card that uses two slots (such as the card in slots 2 and 3 in Figure 3-1) is always addressed by the first of those slot numbers. For example, a digital modem card in the second and third slots has the following address:
{1 2 0}
The item number addresses a particular port or item on the specified slot card. An item-number of 0 (zero) denotes the whole slot.Items start with number 1 for the leftmost item on the card. For example, Figure 3-2 shows the address of the third T1 line on a T1 card in slot #1 in shelf 1.
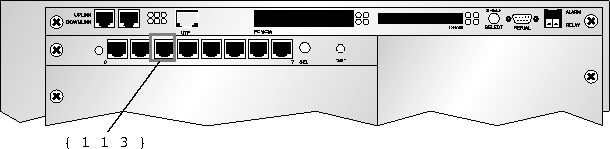
Figure 3-2. Address of an individual T1 line
To read a T1 profile, you must specify its address as the profile index, for example:
admin> read t1 {1 1 3}
T1/{ shelf-1 slot-1 3 } read
IP-Interface profiles are indexed by an interface address within the MAX TNT system. For example:
admin> dir ip-intAn interface address is composed of a physical address and a logical-item number, in the following format:
8 07/14/1997 16:22:15 { { shelf-1 slot-4 1 } 0 }
8 07/14/1997 16:22:15 { { shelf-1 slot-4 2 } 0 }
8 07/14/1997 16:22:15 { { shelf-1 slot-4 3 } 0 }
8 07/14/1997 16:22:15 { { shelf-1 slot-4 4 } 0 }
19 07/14/1997 16:26:45 { { shelf-1 controller 1 } 0 }
{ { shelf-N slot-N item-N } logical-item-N }
The logical item number addresses a specific logical interface. It is zero for the default IP-Interface profile created by the system. If the administrator configures additional logical interfaces, the logical-item number of the profile index does not necessarily have to be contiguous, but must be unique.To access an IP-Interface profile, you must specify its full interface address, for example:
admin> read  ip-int { { 1 4 1 } 0 }
IP-INTERFACE/{ { shelf-1 slot-4 1 } 0 } read
When you list the profile's contents, you'll see an asterisk next to the interface address parameter, indicating that this is the profile's index:
admin> listThe logical-item address syntax explained in this section also applies to individual items on a line or port, such as the individual channels of a T1 line. However, for a T1 channel, the address syntax is not used as a profile index, but only as a way to address the channel in a Call-Route profile. For details, see the MAX TNT Hardware Installation Guide.
interface-address* = { { shelf-1 slot-4 1 } 0 }
ip-address = 10.168.8.25/27
proxy-mode = Off
rip-mode = routing-off
route-filter = ""
rip2-use-multicast = yes
ospf = { no 0.0.0.0 normal 10 40 5 simple ******* 1 16777215 type-1 c0:+
multicast-allowed = no
multicast-rate-limit = 100
multicast-group-leave-delay = 0
The system has one default Call-Route profile that prevents it from dropping calls. In addition, when the system detects the presence of a host slot card (such as a modem or HDLC card), it creates a default Call-Route profile for routing calls to that slot. The administrator may also create any number of Call-Route profiles, and may delete them when they are no longer needed. Call-Route profile indexes use the following format:
{ { { shelf-N slot-N item-N } logical-item-N } entry-N }
The entry number is zero unless the administrator creates additional profiles for the specified address. To see the list of Call-Route profiles, enter the Dir command as in the following example:
admin> dir call-rTo access a Call-Route profile, you must specify its full index, for example:
9 12/11/1996 15:58:08 { { { any-shelf any-slot 0 } 0 } 0 }
13 12/11/1996 15:58:20 { { { shelf-1 slot-2 0 } 0 } 0 }
13 12/11/1996 15:58:21 { { { shelf-1 slot-6 0 } 0 } 0 }
19 12/20/1996 20:57:07 { { { shelf-1 slot-3 0 } 0 } 0 }
admin> read call-r { { { 1 3 0 } 0} 0}
CALL-ROUTE/{ { { shelf-1 slot-3 0 } 0 } 0 } read
When you list the profile's contents, you'll see an asterisk next to the index parameter:
admin> list
index* = { { { shelf-1 slot-3 0 } 0 } 0 }
trunk-group = 0
phone-number = ""
preferred-source = { { shelf-1 slot-2 3 } 0 }
call-route-type = any-call-type
Modifying the working profile
This section explains how to modify an existing profile by setting its parameter values and writing the changes to flash memory. For information about creating profiles, see Creating new profiles.
Reading and writing a profile
To modify an existing profile, you must first read it into the edit buffer by using the Read command. For example:
admin> read logThe profile that has been read into the edit buffer is the working profile. It remains the working profile until another profile is read into the buffer.
LOG read
When a profile has an index, you must specify the index in the Read command; for example:
admin> read conn timThe Write command writes the contents of the edit buffer to flash memory. For example:
CONNECTION/tim read
admin> writeThe Write command does not clear the working profile out of the edit buffer. It simply saves any changes you have made.
CONNECTION/tim written
-f option to the Write command. (For details, see the MAX
TNT Reference Guide.)
Listing the working profile
The List command displays the contents of the working profile. For example:
admin> read log
LOG read
admin> listFor more information about profile contents, see Changing contexts in the working profile.
save-level = debug
save-number = 100
call-info = none
syslog-enabled = no
host = 10.65.212.10
port = 514
facility = local0
syslog-format = tnt
Parameter types and syntax
Table 3-3 shows parameter types with examples of correct syntax and descriptions of their use.
Setting parameters in the working profile
To modify the parameters of the working profile, use the Set command. For example:
admin> read log
LOG read
admin> list
save-level = debug
save-number = 100
call-info = none
syslog-enabled = no
host = 10.65.212.10
port = 514
facility = local0
syslog-format = tnt
admin> set save-number = 250
admin> set syslog = yes
admin> set host = 10.2.3.4
admin> write
LOG written
admin> set call-info ?
call-info:
 Specifies when call status changes are logged.
Enumerated field, values:
 none:  No call info will be displayed.
 end-of-call:  Call info will be displayed at the end of the call.
admin> set call-info ?For information about command history and using the Up Arrow key, see Chapter 2, Getting Started.
admin> set call-info
admin> set call-info = end
auth-client 1 = 10.12.253.1
auth-client 2 = 10.12.253.56Proceed as follows:
admin> set auth-client 1 = 10.12.253.1
admin> set auth-client 1 = 10.12.253.1
admin> set auth-client 1 = 10.12.253.56
admin> set auth-client 2 = 10.12.253.56
Changing contexts in the working profile
In addition to parameters, a profile may also contain subprofiles, which themselves may contain subprofiles, creating several nested levels or contexts within the profile. In addition, some parameters are array values, which also reside in a separate context within the profile.
parameter = value
subprofile = { value-1 value-2 value-3 value-4 value-5 value-6 }
parameter = [ array-element-1 array-element-2 array-element-3 array-e+To set the value of a parameter or display its online help, you must either move to the context in which it resides, or specify the full path of that context on the Set command line.
admin> read external-auth
EXTERNAL-AUTH read
admin> list
auth-type = None
acct-type = none
rad-id-space = unified
rad-id-source-unique = system-unique
rad-serv-enable = no
rad-auth-client = { 0.0.0.0 0.0.0.0 0.0.0.0 0 0 "" no 0 no 0 yes yes no }
rad-acct-client = { 0.0.0.0 0.0.0.0 0.0.0.0 0 0 "" 0 0 acct-base-10 }
rad-auth-server = { 0 no rad-serv-attr-any [ 0.0.0.0 0.0.0.0 0.0.0.0 0.+
tac-auth-client = { 0.0.0.0 0.0.0.0 0.0.0.0 0 0 "" 0 }
tacplus-auth-client = { 0.0.0.0 0.0.0.0 0.0.0.0 0 0 "" 0 0 0 }
tacplus-acct-client = { 0.0.0.0 0.0.0.0 0.0.0.0 0 0 "" }
local-profiles-first = yes
admin> list rad-auth-serverIf a profile contains nested subprofiles, you can move directly to the nested subprofile by specifying multiple subprofile names on the List command line.
auth-port = 0
auth-session-key = no
auth-attribute-type = rad-serv-attr-any
auth-client = [ 0.0.0.0 0.0.0.0 0.0.0.0 0.0.0.0 0.0.0.0 0.0.0.0 0.0.0.0+
auth-netmask = [ 0.0.0.0 0.0.0.0 0.0.0.0 0.0.0.0 0.0.0.0 0.0.0.0 0.0.0.+
auth-key = [ "" "" "" "" "" "" "" "" "" ]
admin> list ..As in a file system, the
auth-type = None
acct-type = none
rad-id-space = unified
rad-id-source-unique = system-unique
rad-serv-enable = no
rad-auth-client = { 0.0.0.0 0.0.0.0 0.0.0.0 0 0 "" no 0 no 0 yes yes no }
rad-acct-client = { 0.0.0.0 0.0.0.0 0.0.0.0 0 0 "" 0 0 acct-base-10 }
rad-auth-server = { 0 no rad-serv-attr-any [ 0.0.0.0 0.0.0.0 0.0.0.0 0.+
tac-auth-client = { 0.0.0.0 0.0.0.0 0.0.0.0 0 0 "" 0 }
tacplus-auth-client = { 0.0.0.0 0.0.0.0 0.0.0.0 0 0 "" 0 0 0 }
tacplus-acct-client = { 0.0.0.0 0.0.0.0 0.0.0.0 0 0 "" }
local-profiles-first = yes
.. characters switch the context up one level. If you have moved several nested levels into a profile, you can move back up several levels at a time by specifying the .. characters repeatedly in the List command line.
admin> set rad-auth-server auth-port = 514Or, you can list the subprofile and then set parameter values as usual. For example:
admin> list rad-auth-server
auth-port = 0
auth-session-key = no
auth-attribute-type = rad-serv-attr-any
auth-client = [ 0.0.0.0 0.0.0.0 0.0.0.0 0.0.0.0 0.0.0.0 0.0.0.0 0.0.0.0+
auth-netmask = [ 0.0.0.0 0.0.0.0 0.0.0.0 0.0.0.0 0.0.0.0 0.0.0.0 0.0.0.+
auth-key = [ "" "" "" "" "" "" "" "" "" ]
admin> set auth-port = 514
To see an example of profile contents that include array values, list the contents of the Rad-Auth-Server subprofile of the External-Auth profile:
admin> list rad-auth-server
auth-port = 0
auth-session-key = no
auth-attribute-type = rad-serv-attr-any
auth-client = [ 0.0.0.0 0.0.0.0 0.0.0.0 0.0.0.0 0.0.0.0 0.0.0.0 0.0.0.0+
auth-netmask = [ 0.0.0.0 0.0.0.0 0.0.0.0 0.0.0.0 0.0.0.0 0.0.0.0 0.0.0.+
auth-key = [ "" "" "" "" "" "" "" "" "" ]
admin> list auth-client
auth-client[1] = 0.0.0.0
auth-client[2] = 0.0.0.0
auth-client[3] = 0.0.0.0
auth-client[4] = 0.0.0.0
auth-client[5] = 0.0.0.0
auth-client[6] = 0.0.0.0
auth-client[7] = 0.0.0.0
auth-client[8] = 0.0.0.0
auth-client[9] = 0.0.0.0
admin> list ..
auth-port = 0
auth-session-key = no
auth-attribute-type = rad-serv-attr-any
auth-client = [ 0.0.0.0 0.0.0.0 0.0.0.0 0.0.0.0 0.0.0.0 0.0.0.0 0.0.0.0+
auth-netmask = [ 0.0.0.0 0.0.0.0 0.0.0.0 0.0.0.0 0.0.0.0 0.0.0.0 0.0.0.+
auth-key = [ "" "" "" "" "" "" "" "" "" ]
admin> set auth-client 1 = 10.12.253.1
admin> set auth-client 2 = 10.12.253.56Or, you could set the addresses from the top level of the External-Auth profile, as in the following example:
admin> set rad-auth-server auth-client 1 = 10.12.253.1
admin> set rad-auth-server auth-client 2 = 10.12.253.56Or, you can list the array and then set array values by specifying the array index in the Set command. For example:
admin> set 1 = 10.12.253.1
admin> set 2 = 10.12.253.56
Creating new profiles
There are two ways to create a new profile:
new profile-type [ profile-index ]If you specify the profile-index on the command line, it is validated before use. For example:
admin> new t1 { 12 2 3 }
error: bad index: unknown value "12"
admin> new system fooIf you specify a legal index, it is applied to the new profile, which is read into the edit buffer:
error: profile has no index
admin> new t1 { 1 2 3 }
T1/{ shelf-1 slot-2 3 } read
admin> listDepending on the profile type, the index chosen can affect the factory default values set in the profile. For example, if you specify the index
physical-address* = { shelf-1 slot-2 3 }
line-interface = { no d4 ami eligible middle-priority inband wink-start+
default for a User profile, the factory default permission settings are as follows:
admin> new user default
USER/default read
admin> listIf you specify the index
name* = default
password = ""
active-enabled = yes
allow-termserv = no
allow-system = no
allow-diagnostic = no
allow-update = no
allow-password = no
allow-code = no
idle-logout = 0
prompt = *
default-status = no
top-status = general-info
bottom-status = log-window
left-status = connection-list
use-scroll-regions = no
log-display-level = none
admin instead, the profile's factory-default permissions are set as follows:
admin> new user admin
USER/admin read
admin> list
name* = admin
password = Ascend
active-enabled = yes
allow-termserv = yes
allow-system = yes
allow-diagnostic = yes
allow-update = yes
allow-password = no
allow-code = yes
idle-logout = 0
prompt = *
default-status = no
top-status = general-info
bottom-status = log-window
left-status = connection-list
use-scroll-regions = no
log-display-level = error
admin> read connection tim
CONNECTION/tim read
admin> set station = dave
admin> set ip remote-address = 10.2.3.4/24
admin> writeThis method can be especially useful for configuring lines and ports. For example, if the eight lines on a T1 card all have a similar configuration, you can copy the parameter settings from one line to the next. For example:
CONNECTION/dave written
admin> read t1 {1 1 1}
T1/{ shelf-1 slot-1 1 } read
admin> list
physical-address* = { shelf-1 slot-1 1 }
line-interface = { no d4 ami eligible middle-priority inband wink-start +
admin> set physical-address = { 1 1 2}
admin> write
T1/{ shelf-1 slot-1 2} written
admin> set physical-address = { 1 1 3}
admin> write
T1/{ shelf-1 slot-1 3} written
Copyright © 1998, Ascend Communications, Inc. All rights reserved.
