![[Top]](../images/home.jpg)
![[Contents]](../images/contents.jpg)
![[Prev]](../images/previous.jpg)
![[Next]](../images/next.jpg)
![[Last]](../images/index.jpg)


Configuring SDSL Cards
This chapter covers the following topics:
Introduction
Note: The MAX TNT must have software version 1.3Ai2 or later to support SDSL. Refer to
the MAX TNT release notes for information about obtaining and loading MAX TNT software.
SDSL is part of a broad range of Ascend MultiDSL offerings that let you implement DSL technologies immediately. SDSL supports high-bandwidth applications such as remote access, Internet or intranet access, and telecommuting. SDSL supports symmetric data transfer rates of 768Kbps for a distance of up to 12,000 feet (3.7 km) over a single pair of copper wires.
SDSL supports Frame Relay and Point-to-Point protocol (PPP). You configure Frame Relay or PPP connections on an SDSL connection in the same way you configure them on a T1 or serial WAN interface.
You can also use your existing authentication methods, such as RADIUS, to authenticate SDSL users, by using PPP protocols in conjunction with PAP or CHAP. You can do this either when the units are first turned on or by setting an inactivity timer.
PPP sessions can be cleared if there is no data activity for a specific period of time. When the remote user attempts to send data, the PPP session is established and, as part of that process, the user is authenticated. This authentication sequence is very similar to the dial-up environment, but with a permanent physical connection. In other words, SDSL lines are always physically connected but can be logically disconnected and reconnected.
For complete details of configuring authentication or Frame Relay and PPP connections on your MAX TNT, refer to the MAX TNT Network Configuration Guide.
Installing the SDSL card
The SDSL card is illustrated in Figure 13-1.

Figure 13-1. MAX TNT SDSL card
You install SDSL cards in the same way you install other MAX TNT slot cards. For instructions, see Installing a slot card.
The next section provides an example of SDSL configuration.
Sample SDSL configuration
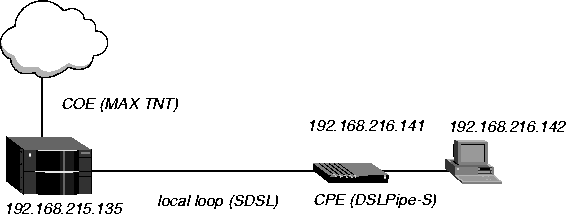
This section describes a common SDSL application. In this example, the SDSL line is a leased connection over a single pair of wires using Frame Relay as the transport protocol (see Figure 13-2).

Figure 13-2. Example SDSL setup
Configuring an SDSL connection requires the following general steps:
- Configuring the SDSL profile
- Configuring the Connection profile
- Configuring the Frame Relay profile
- Configuring the DSLPipe-S
Configuring the SDSL profile
To configure the SDSL profile:
- Read in the SDSL profile. For example, if the SDSL card is installed in slot 11 of shelf 1
and the remote DSLPipe-S is connected to port 1:
admin> read sdsl {1 11 1}
- List the profile:
admin> list
- Enable the port:
admin> set enabled=yes
- List the contents of the line config profile:
admin> list line-config
- Assign this port to a nailed group:
admin> set nailed-up-group=1
This nailed group points the to Frame Relay profile you will create later. The nailed group must be unique for each active WAN interface.
- Move up to the top-level profile:
admin> list..
- Write the profile:
admin> write
Configuring the Connection profile
To configure the Connection profile:
- Create a new Connection profile:
admin> new connection coe-11-1
- List the profile:
admin> list
- Enable the profile:
admin> set active=yes
- Set the encapsulation type to Frame Relay:
admin> set encapsulation-protocol=frame-relay
- List the IP options submenu:
admin> list ip-options
- Set the IP address of the DSLPipe-S connecting to the MAX TNT:
admin> set remote-address=192.168.216.141/24
- Set the IP address of the MAX TNT SDSL port:
admin> set local-address=192.168.215.135/24
- List the Frame Relay options submenu:
admin> list.. fr-options
- Link this Connection profile to the Frame Relay profile you will create in the next section:
admin> set frame-relay-profile=fr-prof-1
- Set the DLCI to the same value as the DSLPipe-S:
admin> set dlci=16
- Open the Telco-Options subprofile:
admin> list.. telco-options
- Set the call type to FT1 (fractional T1):
admin> set call-type=ft1
- Write the profile:
admin> write
Configuring the Frame Relay profile
To configure the Frame Relay profile:
- Create a new Connection profile:
admin> new frame-relay fr-prof-1
- List the profile:
admin> list
- Enable the profile:
admin> set active=yes
- Assign the Frame Relay profile to a nailed-up group:
admin> set nailed-up-group=1
This must be the same as the SDSL nailed group number you configured in the SDSL profile. The nailed group must be unique for each active WAN interface.
- Write the profile:
admin> write
Configuring the DSLPipe-S
This section provides an example of configuring the SDSL Pipeline (DSLPipe-S). Refer to the documentation that came with your Pipeline unit for complete information about configuring the DSLPipe-S.
Before you configure the Pipeline, make sure that:
- The PC connected to the Pipeline has an IP address on the same subnet as the Pipeline
- The IP address of the Pipeline is configured as the default gateway for the PC
To configure the Pipeline:
- From the Main Edit menu, select Configure.
- Specify the following values:
Chan Usage=Leased/Unused
My Name=cpe
My Addr=192.168.216.141/24
Rem Name=coe-11-1
Rem Addr=192.168.215.135/24
Route=IP
- Exit and save the Configure profile.
- From the Main Edit menu, select Ethernet > Connections >COE-11-1.
- Specify the following values:
Active=Yes
Encaps=FR
Route IP=Yes
- Open the Encaps Options submenu.
- Specify the following values:
FR Prof=Frame Relay
DLCI=16
- Exit the Connection profile and save your changes.
Next, set up the Frame Relay profile.
- Open the Ethernet > Frame Relay > Frame Relay profile.
- Specify the following values:
Name=Frame Relay
Active=Yes
Call Type=Nailed
LinkUp=Yes
- Exit the Frame Relay profile and save your changes.
![[Top]](../images/home.jpg)
![[Contents]](../images/contents.jpg)
![[Prev]](../images/previous.jpg)
![[Next]](../images/next.jpg)
![[Last]](../images/index.jpg)


techpubs@eng.ascend.com
Copyright © 1997, Ascend Communications, Inc. All rights
reserved.

